Is your car making an annoying squealing noise when you start the engine? Or maybe you’ve noticed the steering feels a little harder than usual? These could be signs that your serpentine belt is worn out and in need of replacement. 
Understanding how to check and replace serpentine belts is a crucial skill for every car owner, as this simple yet vital component powers essential systems in your vehicle, such as the alternator, power steering, and air conditioning. Ignoring a damaged serpentine belt can lead to costly repairs or even a breakdown at the most inconvenient time.
In this step-by-step guide, we’ll walk you through everything you need to know about checking and replacing your serpentine belt. Whether you’re a complete beginner or just want to brush up on your car maintenance knowledge, this guide will equip you with practical insights to handle the job like a pro. Let’s get started! 

What is a Serpentine Belt?
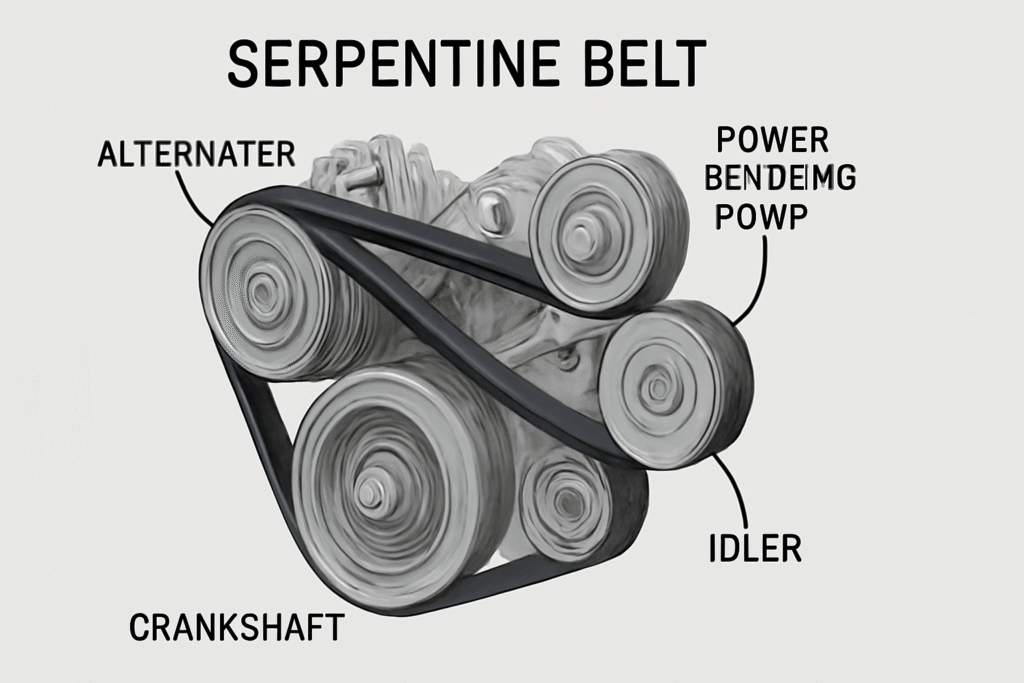
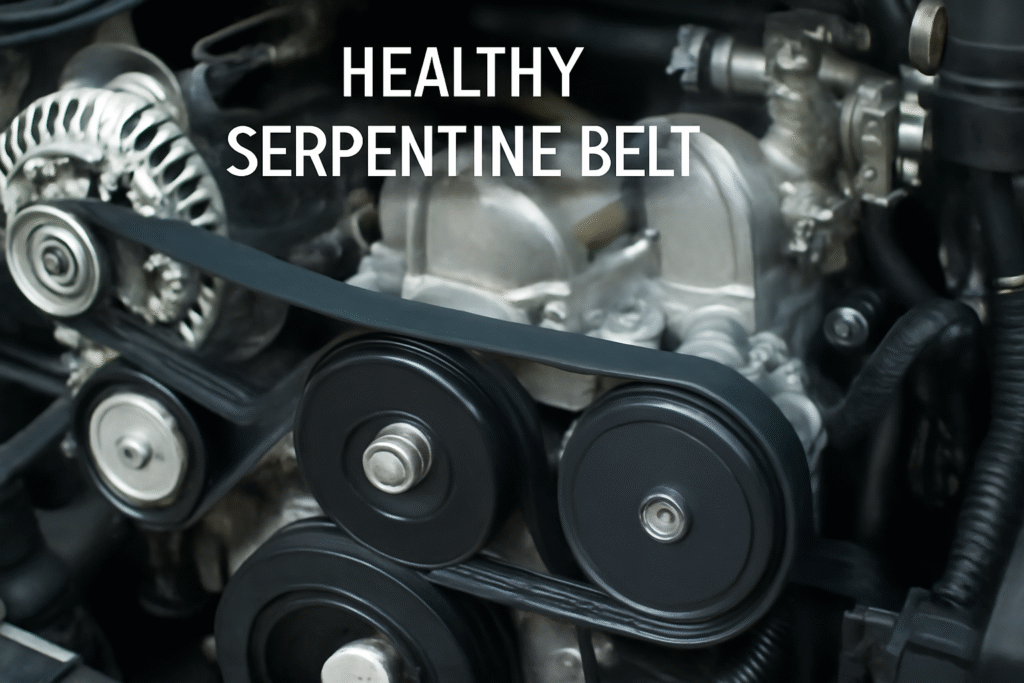
A serpentine belt is a long, continuous rubber belt that plays a critical role in your vehicle’s engine system. Unlike older cars that use multiple belts for different components, the serpentine belt efficiently powers several vital systems with just one belt.
What Does the Serpentine Belt Do?
The serpentine belt connects to various pulleys in your engine and drives components like:
- Alternator – charges the battery.
- Power Steering Pump – makes steering easier.
- Air Conditioning Compressor – cools the cabin.
- Water Pump – circulates coolant to prevent engine overheating.
- Crankshaft Pulley – transfers engine power to other components.
Without a properly functioning serpentine belt, these essential systems won’t work, potentially leaving you stranded on the road. 
Why Is It Called a Serpentine Belt?
The name “serpentine” comes from the belt’s twisting, snake-like path through the engine. It’s designed to be as efficient and space-saving as possible, running along multiple pulleys in one continuous loop.
When Do You Need to Check It?
Over time, serpentine belts can wear out, stretch, or crack, which may lead to poor performance or even engine failure. This is why it’s important to check and replace serpentine belts regularly. Even if it’s not visible to you, a damaged belt can cause big problems under the hood.
Pro Tip: Checking your belt every 30,000 to 50,000 miles, or during regular maintenance, is a good practice to keep your engine running smoothly.
How Often Should You Check and Replace the Serpentine Belt?
The serpentine belt is a crucial component of your car’s engine, but like all parts, it doesn’t last forever. Regular maintenance is key to avoiding sudden breakdowns and expensive repairs. So, how often should you check and replace the serpentine belt? Let’s break it down. 
1. Regular Inspections – Every 30,000 to 50,000 Miles
Most car manufacturers recommend inspecting your serpentine belt every 30,000 to 50,000 miles. This ensures you catch any signs of wear before they turn into serious issues. During routine maintenance, such as oil changes, mechanics will often check the condition of the belt for you.
Pro Tip: If you’re unsure when the last inspection was, check the vehicle’s manual for the manufacturer’s specific recommendation.
2. When to Replace the Belt
While the timing is important, the condition of the belt matters more. You may need to replace your serpentine belt before reaching the mileage limit if you notice any of the following signs:
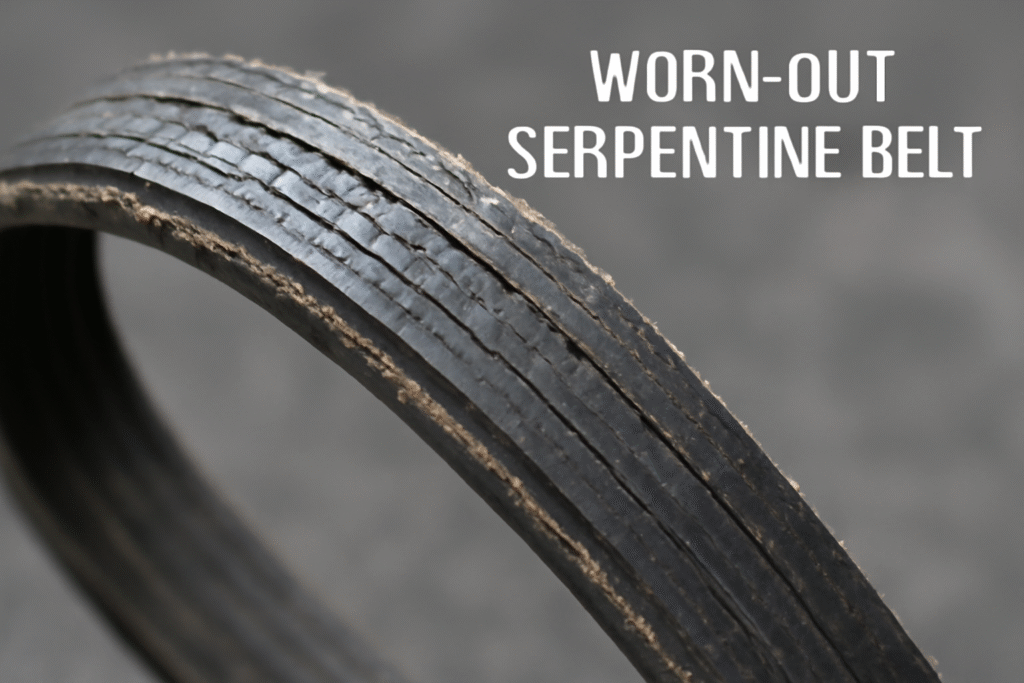
- Cracks, frays, or glazing on the surface of the belt.

- Squealing noises when the engine starts or under load.

- Visible wear or stretching that causes the belt to sag.
If the belt is slipping or looks damaged in any way, don’t wait—replace it immediately to avoid more serious damage to the engine.
3. Extreme Conditions That Might Require More Frequent Checks
If you live in a particularly hot or cold climate, or if your car is frequently subjected to heavy loads (e.g., towing or stop-and-go traffic), you might need to check the serpentine belt more often. The heat can cause the rubber to crack, while extreme cold can lead to belt rigidity and cracking. 
4. Listen for Warning Signs
Your ears can also help you determine when to check your serpentine belt. If you hear a squealing noise or notice that the steering feels heavier than usual, it could be time for an inspection.
How to Check Your Serpentine Belt (Step-by-Step)
Checking your serpentine belt might sound intimidating, but with a few simple steps, you can easily assess its condition and spot any potential issues. Here’s a step-by-step guide to help you check your serpentine belt like a pro. 
Tools You’ll Need:
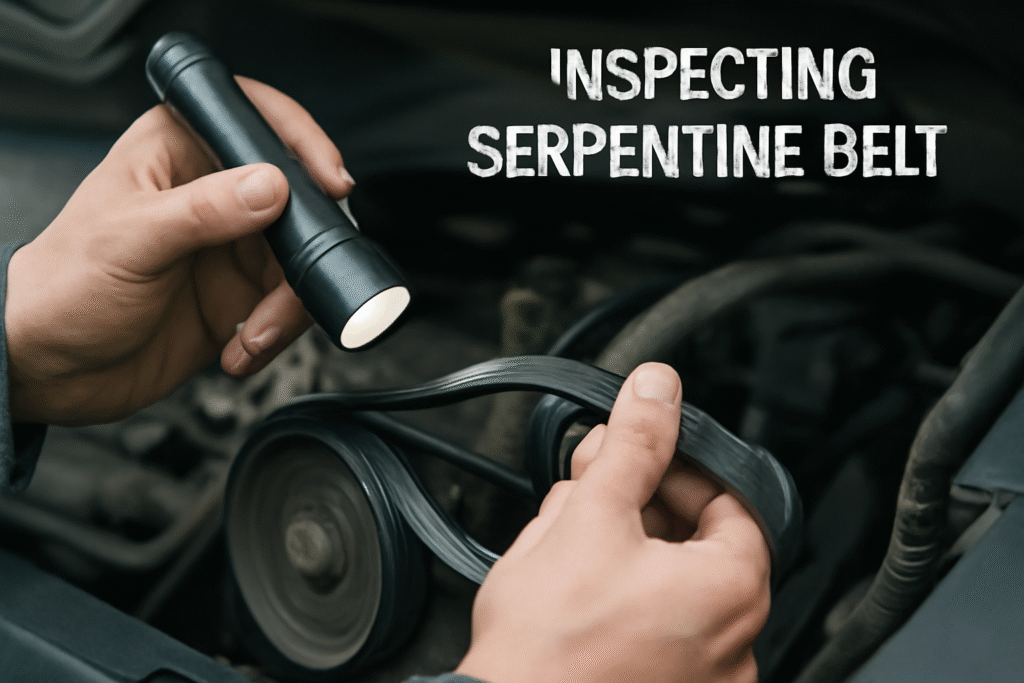
- Flashlight – For better visibility in tight spaces.
- Measuring Tape or Ruler – To check belt tension and stretch.
- Gloves – To protect your hands from dirt and sharp edges.
Step 1: Turn Off the Engine and Open the Hood
Before you start, make sure the engine is turned off and the car is cool. Always prioritize safety! Open the hood to access the engine bay.
Step 2: Locate the Serpentine Belt
The serpentine belt is a long, continuous belt that snakes through several pulleys in the engine. Depending on your car model, it may be easy to spot right near the front of the engine.
Tip: If it’s hard to locate, check your vehicle’s manual for a diagram, or use a flashlight to get a better view.
Step 3: Inspect the Belt for Visible Damage
Take a close look at the belt’s surface. Here’s what to check for:
- Cracks or Frays: Small cracks or fraying along the edges indicate the belt is starting to wear out.
- Glazing: A shiny, smooth surface can happen if the belt is slipping on the pulleys, which causes excessive heat buildup.

- Wear and Tear: Look for uneven wear or pieces of the belt that are missing.
If you see any of these signs, the belt might need replacement.
Step 4: Check for Proper Tension
The serpentine belt should be tight enough to prevent slipping but not so tight that it causes strain on the engine components. You can check the tension by gently pressing down on the belt.
- Proper tension: The belt should only move about 1/2 inch to 1 inch.
- Too loose: If the belt moves more than this, it may need to be tightened or replaced.
- Too tight: If the belt is very stiff or you can’t press it at all, it could put excessive strain on the pulleys and need adjustment.

Step 5: Inspect the Pulleys and Tensioner
The pulleys and tensioner are just as important as the belt itself. Check that the pulleys are aligned correctly and don’t have any noticeable wear or damage. If the pulleys are worn down, it can cause the serpentine belt to fail prematurely.
Pro Tip: If the belt looks good, but your car is still making noise or experiencing issues, the tensioner or pulleys might need attention.
Step 6: Listen for Unusual Noises
Start the car and listen for any squealing, squeaking, or grinding sounds. If you hear any of these, it’s a sign that the belt or one of the components it powers (like the alternator or power steering pump) is struggling. If the sound goes away after a few minutes, it could just be a sign of a loose belt.
How to Replace a Serpentine Belt (Step-by-Step)
Replacing a serpentine belt may seem like a daunting task, but with the right tools and a little patience, you can do it yourself and save money on mechanic fees. Follow these step-by-step instructions to replace your serpentine belt like a pro!
Tools You’ll Need:
- A new serpentine belt (make sure it’s the correct size for your vehicle)

- Wrench or socket set

- Belt tensioner tool (optional, depending on your car model)
- Flashlight
- Gloves (for protection)

Step 1: Turn Off the Engine and Disconnect the Battery
For your safety, always turn off the engine and disconnect the battery before starting any maintenance work. This prevents accidental electrical shocks or engine startups while you’re working. 
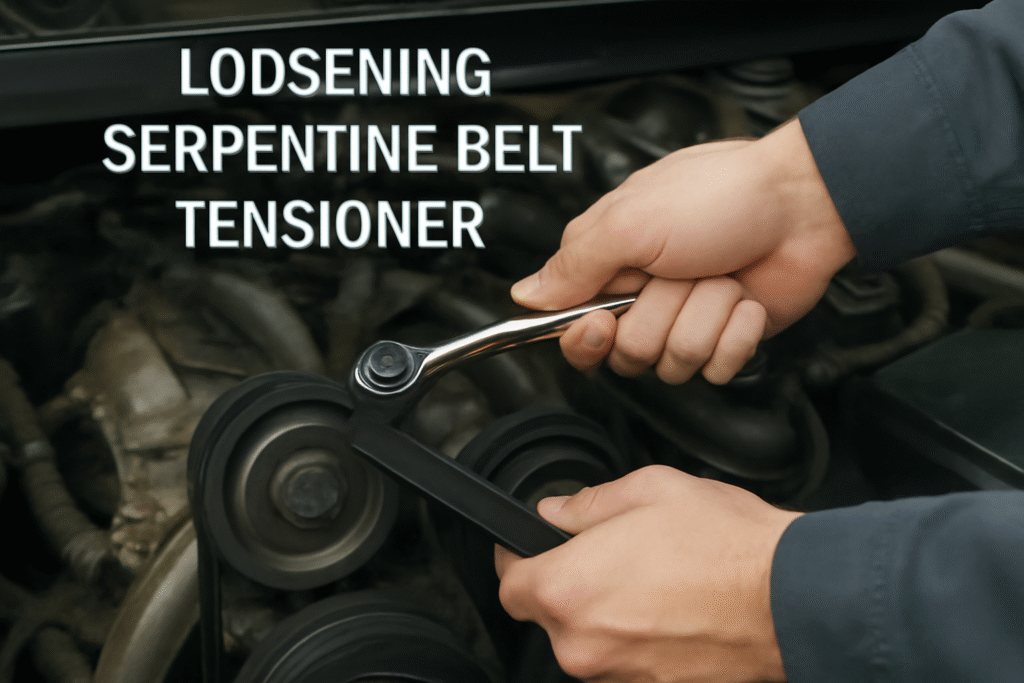
Step 2: Locate the Serpentine Belt Tensioner
Find the belt tensioner, which is a pulley designed to keep the serpentine belt tight. Depending on your car model, this could be spring-loaded or have a manual adjustment mechanism. The tensioner is often the only part that needs to be moved to remove the belt.
Tip: Some vehicles come with a special tool (belt tensioner tool) that makes releasing tension easier. If you don’t have one, a standard wrench or ratchet will often do the job. 
Step 3: Relieve Tension and Remove the Old Belt
- Use the wrench or tensioner tool to release tension from the belt.
- For a spring-loaded tensioner: Pull it away from the belt to loosen it.
- For a manual tensioner: Loosen the bolt until the tension is reduced, allowing the belt to slide off.
- Once the tension is released, carefully remove the belt from the pulleys, starting at the tensioner and working your way around.
Pro Tip: Take a photo of the belt routing before removing it! This will help you install the new belt correctly. 
Step 4: Inspect the Pulleys and Tensioner
Before installing the new belt, inspect the pulleys and the tensioner for any wear or damage. If you notice rough or damaged pulleys, it’s best to replace them to prevent future issues. Also, check the tensioner to make sure it’s working smoothly.
Step 5: Install the New Serpentine Belt
- Take your new serpentine belt and follow the belt routing diagram from your vehicle manual or the photo you took earlier.
- Carefully thread the new belt over the pulleys, ensuring it follows the correct path.
- Make sure the belt is seated properly in all the grooves, especially on the pulleys.
Step 6: Reapply Tension to the Belt
- Use the tensioner to apply proper tension to the new belt. If you’re using a spring-loaded tensioner, it should automatically pull tight as you release it. For a manual tensioner, tighten the bolt to secure the belt in place.
- Ensure that the belt is neither too loose nor too tight. You should be able to press down on it with light pressure and see a small amount of movement (about 1/2 inch to 1 inch).
Step 7: Double-Check the Installation
Once the new belt is in place, double-check the alignment of the belt on all the pulleys and ensure it’s properly tensioned. Start the engine and listen for any unusual noises, such as squealing. If you hear any, shut the engine off and recheck the installation.
Step 8: Test Drive
After confirming that everything looks good, take your car for a short test drive. Pay attention to how the car handles, especially the steering and AC performance. If everything works smoothly, you’ve successfully replaced the serpentine belt! 

Common Mistakes to Avoid When Replacing a Serpentine Belt
Replacing a serpentine belt is a straightforward task, but there are a few common mistakes that can lead to problems down the road. By being aware of these pitfalls, you can ensure that your belt replacement goes smoothly and your engine stays in top shape.
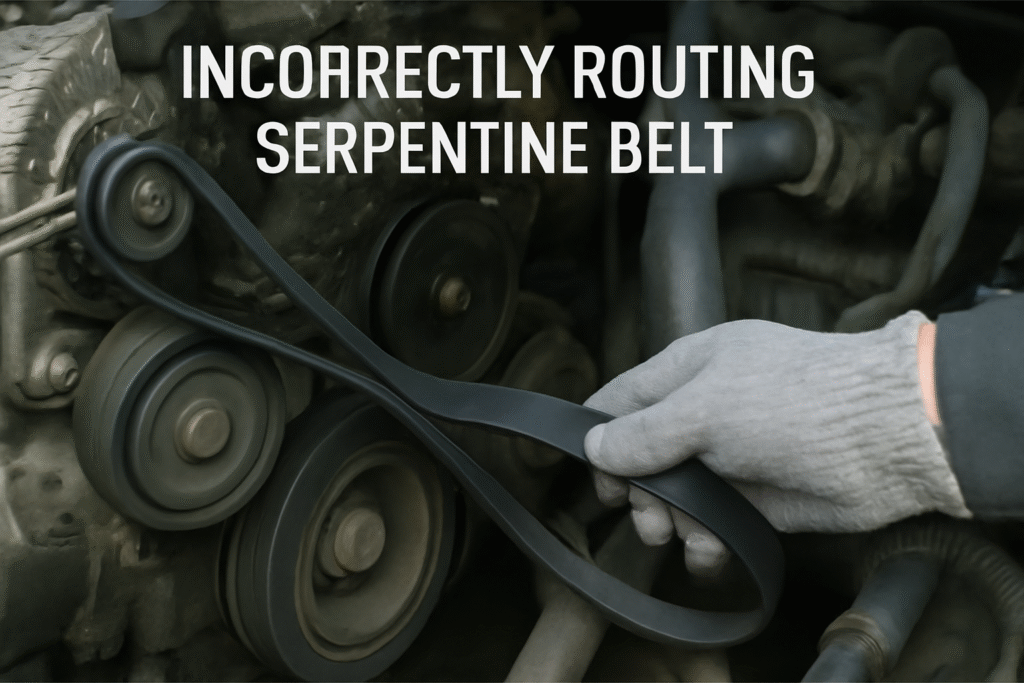
1. Not Checking the Belt Routing Diagram
One of the most common mistakes is forgetting to check the belt routing diagram before removing the old belt. This diagram shows exactly how the belt should be installed over the pulleys.
Tip: Take a picture of the old belt’s routing or refer to the diagram in your vehicle manual to avoid confusion. Installing the belt incorrectly can cause it to slip or even damage engine components.
2. Using the Wrong Size Belt
Using a belt that’s too short or too long is a recipe for failure. A wrong-size serpentine belt can cause it to be too tight (straining the pulleys) or too loose (slipping off during use).
Pro Tip: Always double-check the belt size in your vehicle’s manual or use the belt specification guide when purchasing a new one. Don’t guess—it could cost you later.
3. Not Replacing the Tensioner or Pulleys
While replacing the serpentine belt, it’s easy to overlook the condition of the tensioner and pulleys. If these parts are worn or damaged, the new belt may not last long, or it might not function properly.
Tip: Inspect the tensioner and pulleys for signs of wear (like cracks, corrosion, or rough movement). If they’re damaged, replace them before installing the new belt.
4. Not Checking Belt Tension After Installation
Failing to properly check the belt tension after installation can lead to either slippage or excessive wear. A belt that’s too loose won’t stay in place, while a belt that’s too tight could put unnecessary stress on the pulleys.
Pro Tip: After installing the belt, press on it with light pressure (about 1/2 inch to 1 inch of movement). Make sure it’s properly tensioned to avoid premature wear. 
5. Forgetting to Reconnect the Battery
After replacing the serpentine belt, don’t forget to reconnect the car’s battery before starting the engine! It’s easy to overlook this step, especially if you’ve been working under the hood for a while.
Tip: Always reconnect the battery before testing your repair. A disconnected battery means you won’t have power to your ignition or electrical components. 
6. Ignoring Strange Noises After Replacement
Even after replacing the serpentine belt, some drivers might ignore squealing or grinding noises. If the belt is new but the noises persist, it could indicate an alignment issue or a faulty component that needs attention.
Tip: If you hear unusual noises after installation, don’t assume it’s normal. Recheck the belt routing, tension, and pulleys to ensure everything is installed correctly. 
7. Rushing the Job
Replacing the serpentine belt may seem like a quick fix, but rushing through it can lead to mistakes. Taking the time to double-check your work ensures that the belt is installed properly and that your car is safe to drive.
Tip: Set aside enough time to carefully follow the steps and don’t skip any critical checks. Rushing increases the risk of making an avoidable mistake. 
How to Maintain Your Serpentine Belt and Extend Its Lifespan
Your serpentine belt may seem like a small part of your engine, but it powers major systems—like your alternator, power steering pump, and A/C compressor. With proper care, you can extend its lifespan and avoid costly repairs or breakdowns. Here’s how to keep your serpentine belt running smoothly for miles to come:
1. Inspect It Regularly
Check your serpentine belt every 6 months or 6,000 miles—whichever comes first. Look for:
- Cracks or fraying on the edges
- Glazing (a shiny or slick surface)
- Missing ribs or uneven wear
- Squealing or chirping sounds when starting the car
If you notice any of these signs, it may be time to replace the belt.
2. Keep the Belt Tension Correct 
A belt that’s too loose will slip. A belt that’s too tight can damage pulleys or the belt itself.
 Most modern cars have an automatic belt tensioner—but if yours is manual, check the tension and adjust as needed. You should be able to twist the belt about 90 degrees with moderate pressure.
3. Clean the Pulleys and Belt Area 
Dirt, oil, or coolant leaks can break down rubber and reduce the belt’s grip. Use a clean rag or mild degreaser to wipe down pulleys and nearby surfaces.
 Avoid spraying cleaners directly on the belt.
4. Watch for Fluid Leaks 
Leaking oil or coolant can deteriorate the belt quickly. If you spot a leak near the belt path, fix it ASAP.
Tip: Always check around the valve cover, water pump, and power steering pump for signs of leakage.
5. Avoid Harsh Driving Habits 
Revving your engine frequently or driving aggressively puts stress on the serpentine belt and related components. Gentle acceleration and regular maintenance reduce wear and tear.
6. Replace It at Recommended Intervals 
Even if it looks fine, manufacturers typically recommend replacing the serpentine belt every 60,000 to 100,000 miles. Follow your vehicle’s service schedule to avoid surprise failures.
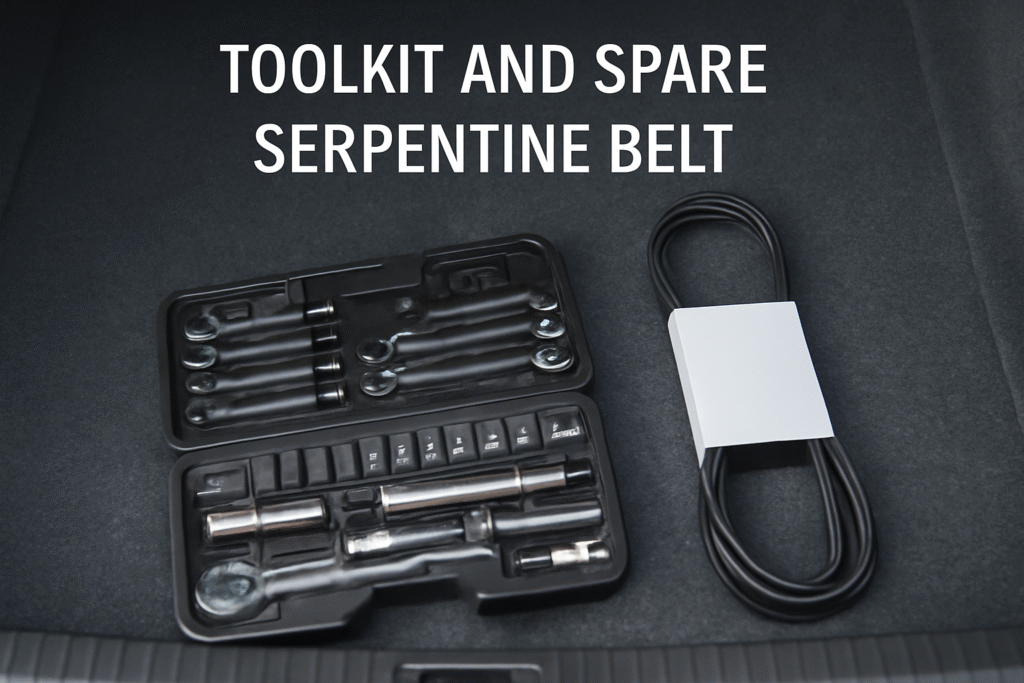
7. Keep a Spare Belt Handy
It’s smart to keep a spare serpentine belt in your trunk—especially for long trips. If your belt fails on the road, having a replacement can save you from being stranded.
Keep Your Car Running Smoothly with Simple Serpentine Belt Care
Checking and replacing your serpentine belt may seem like a small task—but it plays a huge role in your car’s performance and reliability. A worn or broken belt can affect your alternator, power steering, air conditioning, and more—leaving you stranded and facing expensive repairs  .
.
The good news? You don’t need to be a mechanic to stay on top of it.
With regular visual checks, proper tension, and timely replacement, you can extend the life of your serpentine belt and keep your engine components working in harmony . Use this guide as your go-to resource to inspect, maintain, or replace the belt confidently.