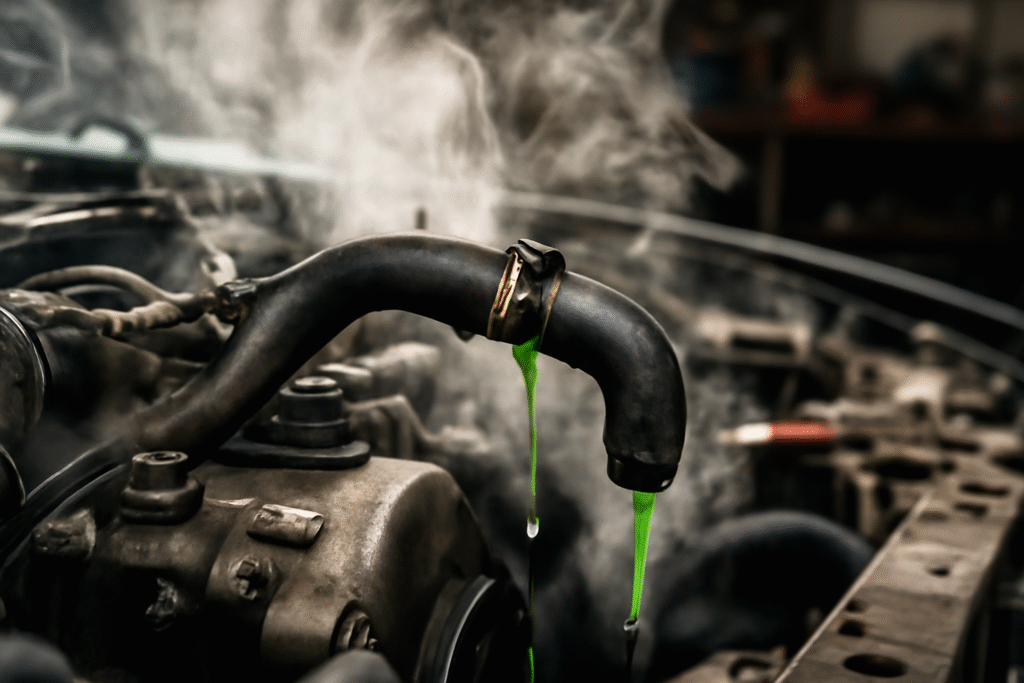
Is your car overheating, or are you noticing coolant leaks on the ground?  A damaged radiator hose might be the culprit! If you’ve ever experienced sudden engine temperature spikes or the sweet smell of coolant, you’re not alone. The good news? How to replace a radiator hose is a straightforward task that can save you from costly repairs and prevent engine damage.
Radiator hoses are a crucial part of your car’s cooling system, and when they wear out or crack, the results can be catastrophic—leading to overheating or even engine failure. Replacing a radiator hose is something most car owners can do themselves with a bit of guidance. This step-by-step guide will walk you through everything you need to know, from identifying the problem to replacing the hose and preventing future issues.
By the end of this article, you’ll have the confidence to tackle this DIY repair, save money, and ensure your vehicle runs smoothly for years to come! Keep reading to discover how easy it can be to fix this problem on your own. 

Understanding the Radiator Hose
Before you dive into replacing your radiator hose, it’s important to understand its role in your car’s cooling system. The radiator hose is a vital part of your vehicle’s ability to stay cool and function properly. Let’s break it down:
What is a Radiator Hose?
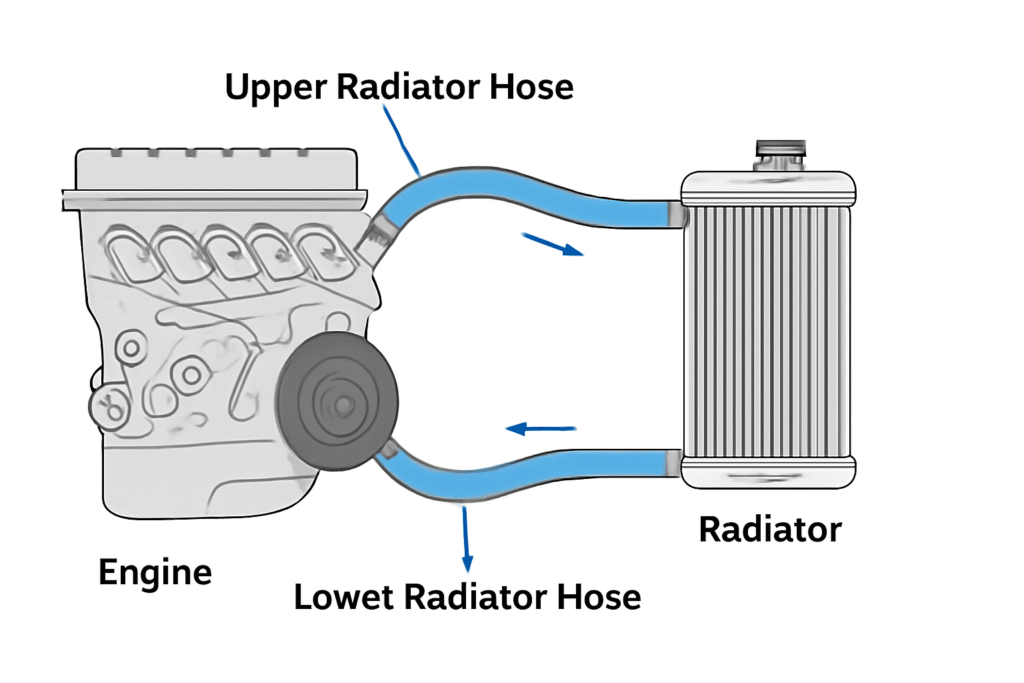
A radiator hose is a flexible tube that connects your engine to the radiator. Its primary job is to carry coolant between these two components, helping to regulate the engine’s temperature. Without a functioning radiator hose, your engine can overheat, leading to expensive damage.
Types of Radiator Hoses
There are typically two main radiator hoses in most cars:
- Upper Radiator Hose – This hose connects the engine to the top of the radiator. It carries hot coolant from the engine to the radiator to be cooled.
- Lower Radiator Hose – Located at the bottom, this hose carries the cooled coolant back into the engine. It plays a key role in maintaining the continuous flow of coolant throughout the system.
How the Radiator Hose Works
- As the engine heats up, the coolant absorbs the heat and moves through the upper hose to the radiator.
- The radiator cools down the coolant by transferring the heat to the air, and the cooled fluid travels back into the engine through the lower hose.
- This cycle repeats, keeping the engine at an optimal temperature.
Signs of a Damaged Radiator Hose
Over time, radiator hoses can wear out, crack, or become clogged. Here are some common signs to look out for:
- Leaks or Cracks: Visible cracks or bulges in the hose could cause coolant to leak, leading to a loss of coolant and overheating.
- Overheating Engine: If your car consistently runs hot, it could be due to a compromised radiator hose not circulating coolant properly.
- Coolant on the Ground: If you notice a puddle of coolant beneath your vehicle, it could be leaking from the hose.
- Sweet Smell: The distinct sweet smell of coolant in the air or under the hood is another sign that something is wrong with your radiator system.
Why It’s Important to Replace a Faulty Radiator Hose
When it comes to car maintenance, replacing a faulty radiator hose isn’t just a small repair—it’s essential to protecting your engine and avoiding expensive long-term damage. Here’s why it’s so important to replace a damaged or worn-out radiator hose as soon as you spot an issue:
1. Prevent Engine Overheating
The radiator hose plays a crucial role in regulating your engine’s temperature. If the hose is damaged or leaking, coolant can’t flow properly, which can cause the engine to overheat. An overheating engine can lead to:
- Warped cylinder heads
- Blown head gaskets
- Severe engine damage
These issues are not only expensive to fix, but they can also render your car inoperable. Replacing the radiator hose promptly prevents this costly scenario.
2. Avoid Costly Repairs
A small leak in the radiator hose might seem insignificant, but it can quickly escalate into a much larger problem. Leaking coolant can damage other parts of your vehicle’s cooling system, such as the radiator or water pump, leading to even higher repair costs. By replacing the hose early, you prevent secondary damage and save money on more complex repairs.
3. Improve Vehicle Longevity
A healthy radiator system helps keep your engine running efficiently. Over time, a damaged hose can compromise the entire cooling system, putting unnecessary stress on other engine components. When you replace a faulty radiator hose, you’re not just fixing the immediate problem; you’re ensuring your vehicle continues to run smoothly for years to come.
4. Prevent Coolant Loss
If your radiator hose is leaking, it means coolant is escaping from the system. This can cause a drop in coolant levels, which can further exacerbate engine overheating. Keeping the coolant levels where they should be is essential for your engine’s performance and longevity. A new, secure hose will stop leaks and keep the coolant circulating properly.
5. Maintain Performance and Fuel Efficiency
An efficient cooling system keeps your engine running at the right temperature, which directly affects fuel efficiency. If your engine is constantly running hot due to a bad hose, your vehicle may consume more fuel to maintain performance. By replacing a damaged radiator hose, you’re helping your car perform optimally, which can even save you money at the pump.
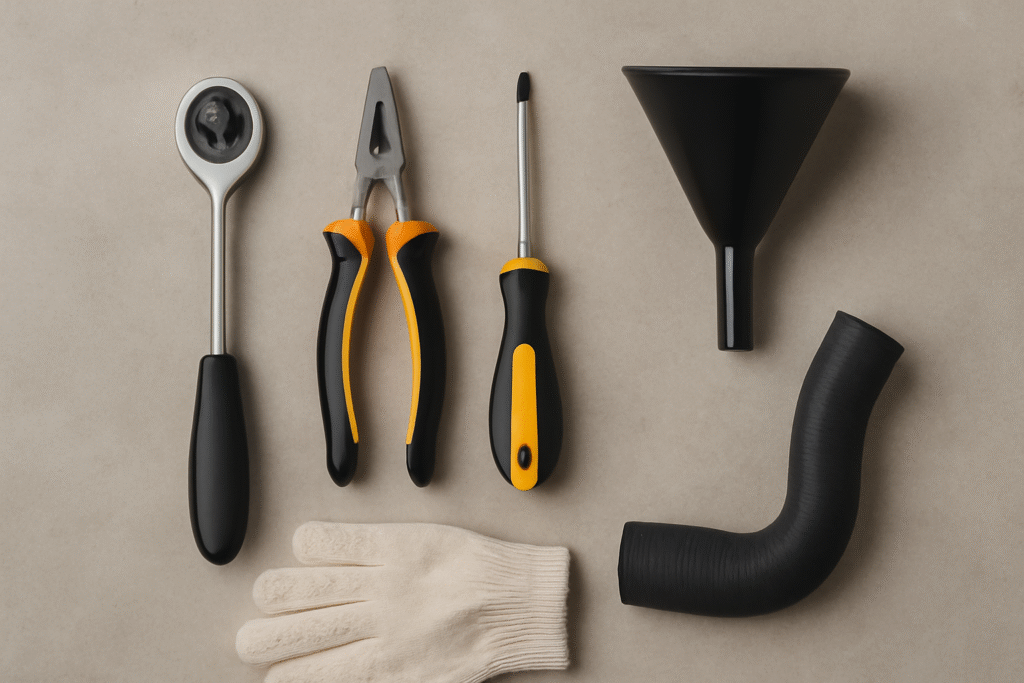
Tools and Materials Needed
Before you begin replacing your radiator hose, it’s essential to have the right tools and materials on hand. Having everything ready will make the process smoother, faster, and more efficient. Here’s a list of what you’ll need to get the job done:
Tools:
- Socket Wrench Set
A socket wrench will help you remove the hose clamps and bolts holding the radiator hose in place. Make sure you have the right size sockets for your car’s specific model. - Pliers
Pliers are necessary for removing and tightening the hose clamps that secure the hose to the engine and radiator. You’ll likely need adjustable pliers to loosen tight clamps. - Flathead Screwdriver
A flathead screwdriver can come in handy to help pry off stubborn hose clamps or loosen parts that are a bit stuck. - Coolant Catch Pan
When you remove the radiator hose, coolant will leak out. A catch pan helps collect the coolant to prevent mess and allow for proper disposal. - Funnel
After removing the old hose, you’ll need a funnel to refill the radiator with coolant, ensuring you don’t spill or waste any liquid. - Safety Gloves and Goggles
It’s important to protect your hands from hot coolant and sharp metal parts. Safety gloves and goggles will keep you safe while handling the hoses and engine components.
Materials:
- Replacement Radiator Hose
Make sure the replacement hose is compatible with your car’s make and model. Radiator hoses come in various sizes and materials, so double-check your car manual or consult with a parts store before purchasing. - Hose Clamps
If your old clamps are rusted or damaged, you’ll need new hose clamps to secure the new radiator hose in place. Many hoses come with new clamps, but it’s good to have them on hand just in case. - Coolant
You’ll need coolant to refill the radiator once the old hose is replaced. Make sure to use the correct type and mixture for your vehicle. Refer to your owner’s manual for specifications on the best coolant for your car. - Rags or Towels
Keep a few rags or towels nearby to clean up any spills or drips. It’s a good idea to wipe down the area around the hose to ensure there’s no dirt or debris before installing the new hose.
How to Replace a Radiator Hose – Step-by-Step Guide
Replacing a radiator hose might seem like a daunting task, but with the right tools and a little patience, it’s a manageable DIY repair. Follow these steps to replace the hose and ensure your engine stays cool and running smoothly.
Step 1: Safety First
Before you begin, ensure your car is off and the engine is completely cool. Working on a hot engine can result in burns from hot coolant or engine parts.
- Turn off the engine and let it cool for at least 30 minutes.
- Disconnect the car battery to avoid electrical issues while working under the hood.
Step 2: Locate the Radiator Hose
Your car has two radiator hoses: the upper and lower hoses. They are connected to the radiator and engine.
- Identify the upper radiator hose (it connects the engine to the top of the radiator) and the lower radiator hose (it connects the radiator to the engine block).
- Refer to your car’s manual for specific locations if you’re having trouble finding them.
Step 3: Drain the Coolant
You’ll need to drain the coolant before removing the radiator hose to avoid spills and leaks.
- Place a catch pan beneath the radiator drain valve.
- Open the drain valve and let the coolant flow into the pan. If your car doesn’t have a drain valve, you can remove the lower radiator hose to allow the coolant to drain.
Step 4: Remove the Old Radiator Hose
Once the coolant has drained, you can remove the old hose.
- Use pliers or a flathead screwdriver to loosen the hose clamps at both ends of the hose. Make sure you’re loosening, not tightening the clamps.
- Carefully twist and pull the hose off the fittings. If it’s stuck, gently wiggle it or use a little force to loosen it. Be cautious to avoid damaging the radiator or engine connections.
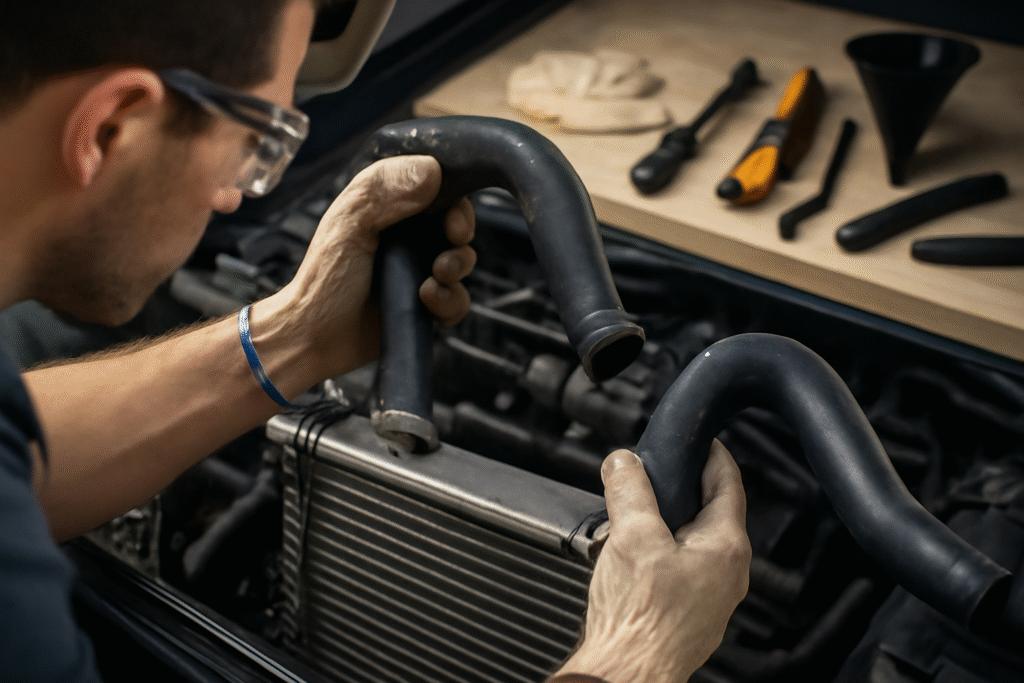
Step 5: Install the New Radiator Hose
Now that the old hose is removed, it’s time to install the new one.
- Position the new radiator hose over the engine and radiator fittings, making sure it fits securely.
- Slide the hose clamps over the hose at both ends and tighten them. Ensure the clamps are snug but not over-tightened, as this could damage the hose.
Step 6: Refill the Coolant
With the new hose installed, it’s time to refill the radiator with coolant.
- Use a funnel to pour the appropriate coolant into the radiator. Refer to your owner’s manual for the correct type of coolant for your vehicle.
- Fill the radiator slowly, checking for any signs of leaks around the new hose as you go.
Step 7: Test the System
Now that everything is in place, it’s time to test the new hose and cooling system.
- Reconnect the car battery and start the engine.
- Let the engine run until it reaches its normal operating temperature.
- Check for leaks around the new hose and ensure the engine temperature stays within the normal range.
Step 8: Dispose of Old Coolant Properly
Never dump used coolant down the drain or on the ground.
- Store the old coolant in a sealed container and take it to a local recycling center or auto parts store for proper disposal.
Common Mistakes to Avoid
Replacing a radiator hose is a relatively simple task, but there are a few common mistakes that can cause problems down the line. Here are some key pitfalls to avoid, ensuring your repair goes smoothly and your car runs efficiently.
1. Using the Wrong Type of Hose
Not all radiator hoses are created equal. Each vehicle has specific size and material requirements for its hoses.
- Mistake to avoid: Purchasing a hose that doesn’t fit or isn’t made for your car’s engine.
- Solution: Double-check the specifications in your car’s manual or consult with a professional before buying the replacement hose. Ensure it matches the size, shape, and material needed for your vehicle.
2. Over-tightening the Hose Clamps
While you need to secure the hose with the clamps, over-tightening can damage the hose and lead to leaks.
- Mistake to avoid: Tightening the clamps too much, which can crush the hose or cause stress on the connection.
- Solution: Tighten the clamps enough to hold the hose in place securely, but be sure not to go beyond that. A snug fit is sufficient to prevent leaks.
3. Failing to Drain the Coolant Properly
Draining the coolant before starting the repair is essential to prevent spills and ensure that no old coolant contaminates the new fluid.
- Mistake to avoid: Not draining the coolant or trying to skip this step, which can result in a mess and possibly damaging the car’s engine.
- Solution: Always drain the coolant fully into a catch pan. If you’re unsure, refer to your car’s manual to find the best method for draining.
4. Not Inspecting the Radiator for Damage
While replacing the radiator hose, take a moment to inspect the radiator itself for any signs of cracks or damage.
- Mistake to avoid: Replacing the hose without checking the radiator for issues, which could lead to further leaks or overheating.
- Solution: Look over the radiator for any visible cracks, dents, or leaks. If you spot damage, it might be time to replace the radiator or repair it as well.
5. Reusing Old Clamps
If the clamps holding the old hose in place are rusted, cracked, or damaged, reusing them can lead to failure down the road.
- Mistake to avoid: Reusing old, damaged hose clamps.
- Solution: Replace the hose clamps with new ones, especially if the old ones show signs of wear or corrosion. This ensures a secure and leak-free fit.
6. Not Checking for Leaks After Installation
Even if you’ve replaced the hose and refilled the coolant, you need to check for leaks before driving.
- Mistake to avoid: Not thoroughly checking for leaks after the installation.
- Solution: After starting the engine and running it for a few minutes, check all hose connections for any signs of coolant leaking. Tighten the clamps as needed and make sure the engine temperature stays stable.
7. Using the Wrong Coolant
Using the wrong type of coolant can cause damage to your engine or make the cooling system ineffective.
- Mistake to avoid: Refilling the radiator with the wrong coolant type or mixture.
- Solution: Refer to your vehicle’s manual to find the specific coolant type required. Ensure that the coolant is mixed correctly (if necessary) to prevent engine overheating.
Replacing a faulty radiator hose is an essential step in maintaining your vehicle’s cooling system and preventing costly engine damage. By following the step-by-step guide in this article, you can tackle this repair with confidence and save money by handling it yourself.
Remember, a properly functioning radiator hose helps regulate your engine’s temperature, preventing overheating, reducing the risk of further damage, and extending your car’s lifespan. By using the right tools, avoiding common mistakes, and checking for leaks after the repair, you ensure that your vehicle stays in top condition.
If you notice any signs of a damaged radiator hose, don’t delay the repair—taking action early can save you from more expensive repairs down the road. With a bit of effort and the right knowledge, you’ve got this!
Now that you know how to replace a radiator hose, you can perform this repair whenever necessary, keeping your car running smoothly for years to come. Happy driving!